Creating custom clothing for your Roblox avatar adds a personal touch to your in-game appearance, allowing you to stand out in the vast world of Roblox. The Roblox shirt template is a blueprint that serves as the starting point for your design process. It’s essential to understand how to utilize this template effectively to produce clothing items that not only look good but also fit properly on your avatar.
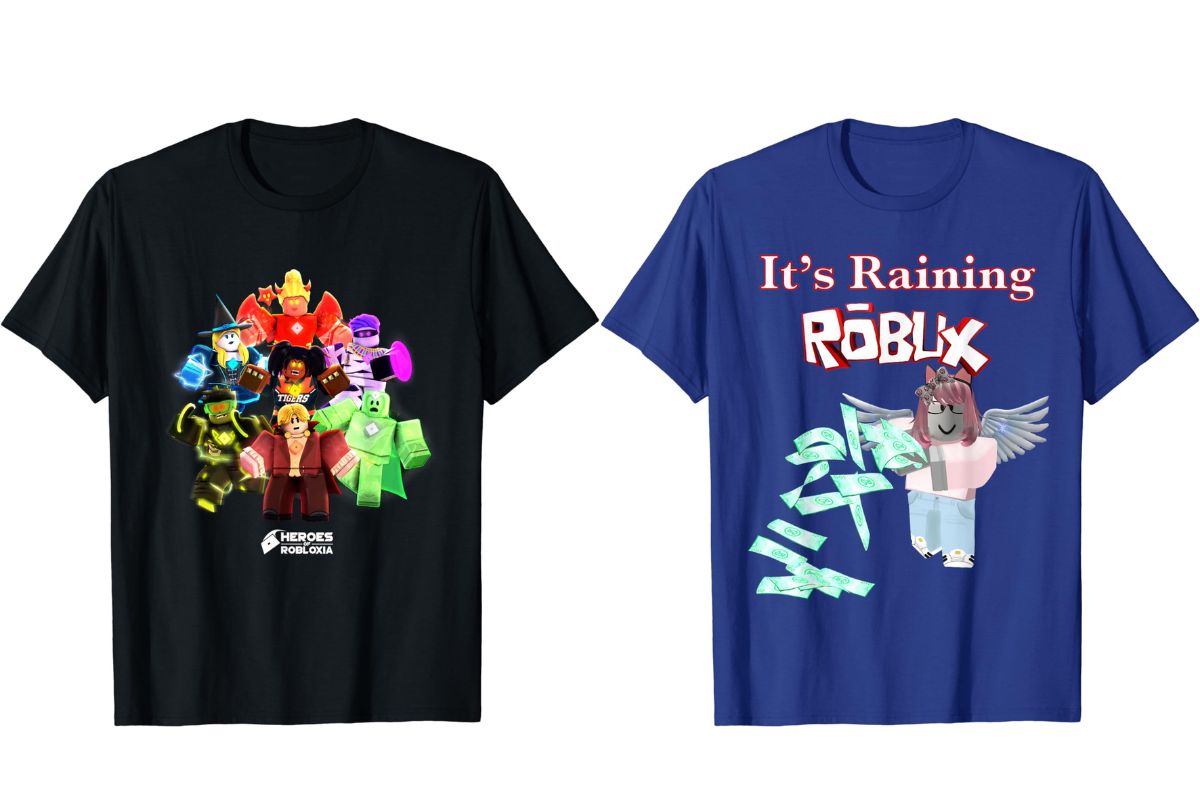
Designing your own Roblox clothing using the provided templates is a straightforward process. Once you download the template, you can modify it using various graphic design tools. The template is broken down into different sections, each corresponding to a part of the shirt, which makes it easier for you to apply your designs accurately. Colors, graphics, and patterns can all be customized to your liking, ensuring that your avatar’s shirt is uniquely yours. After perfecting your design, you can upload it to the Roblox Marketplace, where you have the option to sell it to other players, potentially earning Robux, the in-game currency.
Understanding the nuances of the template is crucial for creating clothing that resonates with the Roblox community. To make the most of this opportunity, focus on originality and quality in your designs. With practice, you can refine your skills and develop a signature style that may become popular among your fellow Robloxians.
Understanding Roblox Shirt Templates
Roblox shirt templates are crucial for creating custom clothing for avatars in Roblox. They provide the structure needed to ensure that designs will align correctly on the avatar’s torso and arms.
Template Basics
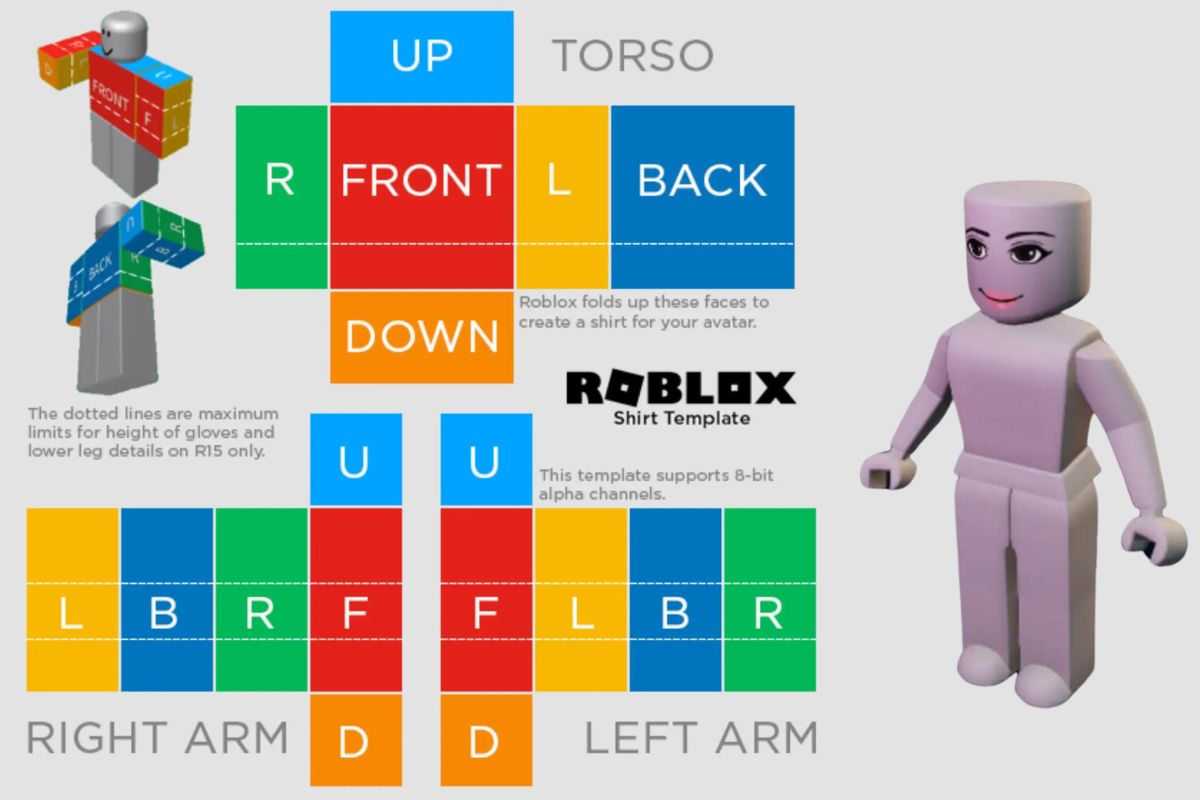
The Roblox shirt template is essentially a blueprint that you’ll use to design your clothing items. This template shows the dimensions for different parts of the shirt, such as the torso, arms, and shoulders. The size of the standard template for shirts is 585 pixels wide by 559 pixels tall. This corresponds to the front, back, left side, and right side of the torso, as well as the front and back of each arm. It is pivotal to understand that areas of the template not filled with your design will display as transparent in the game.
Download and Software Options
To start your design process, you must first download the Roblox shirt template. This is available as a PNG image file, which you can open with various image editors like Adobe Photoshop, GIMP, or Pixlr. These tools allow you to directly apply your designs onto the template with precision.
- Adobe Photoshop: Offers advanced features for professional designs
- GIMP: A free, open-source image editor suitable for beginners and pros
- Pixlr: A web-based editor that provides quick and easy access to basic tools
Design Principles and Tips
When creating your design, consider the following to ensure it looks great on your avatar:
- Color and Patterns: Use colors that complement each other. Patterns should align with the shapes and angles of the template.
- Graphics and Logo Placement: Position your graphics and logos thoughtfully, keeping in mind how the image wraps around a 3D avatar.
- Transparency: Understand that any unedited space will show up as transparent on the model.
- Test Your Design: Always test how your shirt looks on a Roblox avatar to make adjustments for unexpected distortions or alignments.
Remember, designing Roblox clothing is just as much an art as it is a technical skill. Be patient with your learning curve, and don’t be afraid to experiment with different designs and techniques.
Creating Your Roblox Shirt
Creating a unique Roblox shirt involves editing a given template, adding personal touches, and finalizing your design for upload. Precision in each step ensures your avatar will stand out with your custom shirt.
Editing the Template
Firstly, acquire the Roblox shirt template which provides the framework for your design. It consists of specific areas marked for the front, back, sides, and sleeves. Photoshop or Pixlr E, which are advanced image editing tools, will give you the flexibility to manipulate layers and elements on the template. Open your image file in the editor of your choice, ensuring you keep the correct dimensions — usually 585 pixels wide by 559 pixels tall.
Adding Personal Touches
This stage is where you infuse your shirt with creativity. Select bold colors, intricate patterns, or incorporate your own graphics and logos. The layering feature in your editing software allows for complex designs without altering the base template. Also, remember to maintain transparency in the template’s unused areas, so your shirt fits the Roblox avatar model correctly.
Finalizing Your Design
Before you finalize, use the preview functionality in your image editor to visualize how your shirt looks on a dummy or plain template. This step is crucial for testing if the elements align properly when worn by an avatar. Save your completed design as a PNG to preserve transparency and upload it to Roblox’s platform for use or to sell to other players. Ensure your file meets Roblox’s size and format requirements to avoid upload errors.
Uploading and Publishing
Successfully uploading and selling your custom Roblox shirt entails an understanding of the technical upload process, pricing strategies, and social tactics that boost visibility.
The Upload Process
To initiate the upload process, access the Asset Manager on the Roblox platform. After ensuring your shirt or pants design aligns with the required template dimensions—typically 585×559 pixels—you can proceed to upload your item. Here are the steps:
- Click the ‘Create’ tab on the top navigation bar and select ‘Shirts’ or ‘Pants‘ from the left-hand menu.
- Press the ‘Choose File’ button to locate and select your designed template.
- Click the ‘Upload’ button and wait for the confirmation that your item has been successfully uploaded to your Roblox account.
During this phase, it’s crucial for your design to be tested on an avatar to ensure it adheres well and looks as expected in a 3-dimensional space.
Setting Up for Sale
Post-upload, it’s time to make your creation available for sale on the Roblox marketplace. Follow these instructions to set up your item:
- Navigate back to the Asset Manager and find the uploaded item.
- Click the ‘Configure’ option next to the item to access the item’s configuration page.
- Within the Sales section, toggle Item for Sale to its on position.
- Define your price in Robux by entering a value in the provided field.
Remember to craft a catchy name and compelling description for your item to help it stand out in the marketplace.
Promotion and Social Sharing
Maximize your design’s exposure and potential sales through effective promotion:
- Social Media: Share your creation on platforms like Twitter, Instagram, and Facebook. Employ hashtags like #RobloxDev or #RobloxClothing to reach more Roblox players.
- Roblox Community: Engage with the community in Roblox forums and groups to showcase your work and gather feedback.
- In-Game: Wear your own designs to promote directly to other players in-game.
By leveraging social channels and the Roblox community, you can increase your shirt’s visibility and foster an audience eager to see and purchase your next creation.
Technical Specifications and Considerations
When creating a shirt for Roblox, it’s critical to adhere to specified image file requirements and copyright laws. Ensuring your shirt design meets these standards is crucial for a seamless upload process and to avoid any legal issues.
Image File Requirements
Your design starts with a template which you can download from the Roblox website. For Roblox shirts, your image file must be in PNG format to maintain transparency. The size and dimensions are especially important for the item to display correctly in-game. The recommended dimensions for a shirt image are 585×559 pixels.
After designing, you should preview your shirt to see how it will look once uploaded. This preview is an essential step to verify the design aligns properly on the avatar’s body. Here’s a list of technical requirements for the image file:
- Format: PNG (allows for transparency)
- Size: Must not exceed the Roblox upload limit.
- Dimensions: Typically 585×559 pixels for shirts.
Legal and Copyright Compliance
When uploading a shirt to sell on Roblox for Robux, be mindful of copyright issues. Using copyrighted images, logos, or patterns without permission can lead to your content being removed and possibly legal action against you. Always use original designs or assets you have the rights to use. Here are some guidelines to follow:
- Originality: Ensure the artwork is of your own creation.
- No Trademarked Material: Refrain from using logos or designs that are trademarked by other companies.
- Roblox Policy Adherence: Follow the Roblox community and copyright rules.
Remember, while Roblox encourages creativity, your designs must operate within these technical and legal boundaries to be part of the platform’s vast marketplace.
Community and Support
In navigating the Roblox platform’s robust design environment, you’ll find that both community engagement and dedicated support resources are invaluable to optimizing the results of your creative endeavors. Whether it’s tweaking a shirt template or advertising your newest creation, understanding how to leverage these two pillars will significantly enhance your experience as a Roblox clothes maker.
Leveraging the Roblox Community
The Roblox community is a dynamic resource that you, as a creator, can tap into for feedback, inspiration, and collaboration. When you design avatar clothing, sharing your creations on social media platforms can garner valuable Roblox reviews and suggestions. These insights are essential to refining your designs and ensuring they resonate with your target audience.
- Join Groups: Connect with designer groups where members often exchange tips and showcase their latest works.
- Read Forums: Stay updated with the latest trends and user preferences by reading forum threads dedicated to Roblox design.
By actively participating in these community facets, you foster relationships that can lead to better recognition of your clothes maker skills and potentially increase sales on the Roblox marketplace.
Using Support Resources
Roblox provides a suite of support resources to help you manage your creations effectively. Whether you’re using a desktop browser or a mobile device, the platform is designed to be user-friendly. To start creating and uploading t-shirts or other clothes:
- Access Tutorials: Roblox offers comprehensive guides to navigate the upload process and troubleshooting.
- Roblox Premium: Consider subscribing to Roblox Premium for additional features like increased selling capacity and access to exclusive items that can improve your designs.
- Help Pages: Utilize the help pages for step-by-step instructions on creating and uploading t-shirts.
- Asset Manager: Make use of the Roblox Asset Manager to test and manage your clothing items conveniently.
Keep in mind that the tools offered are constantly evolving, so staying informed about new features can help maintain the competitiveness and appeal of your creations.
Advanced Design Techniques
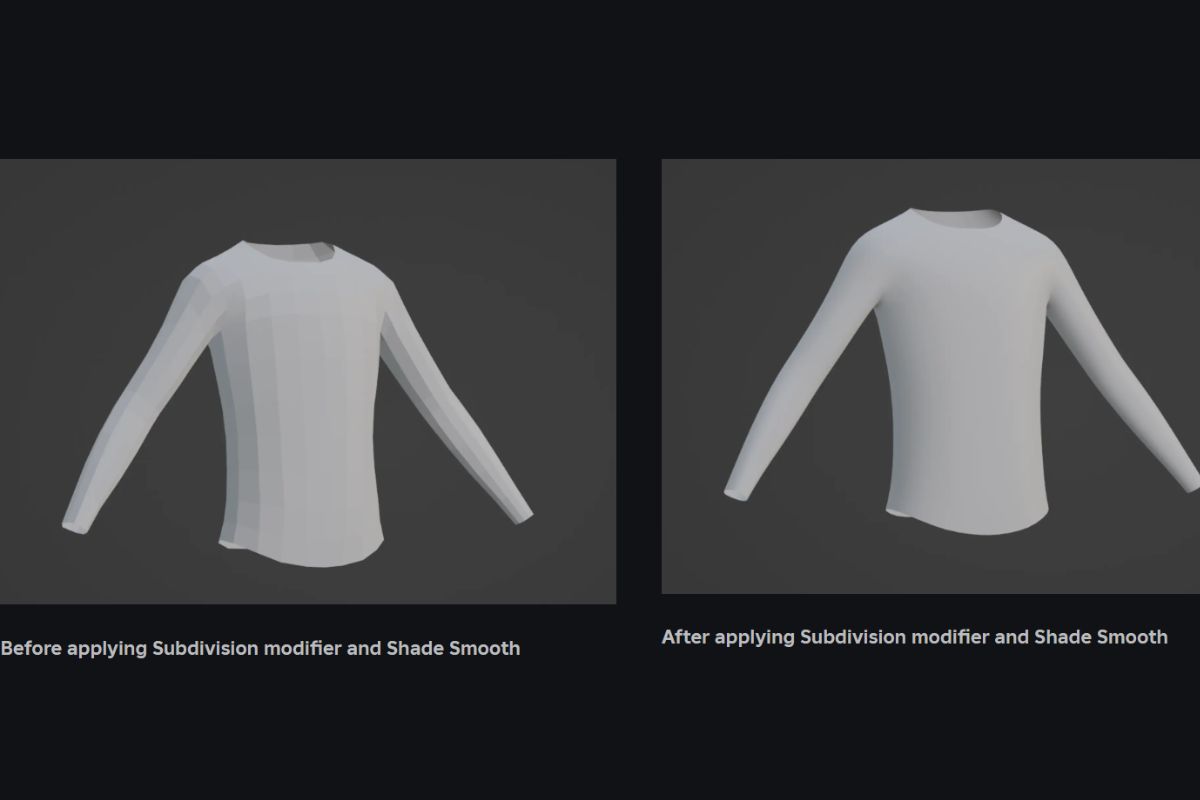
In the realm of Roblox shirt designing, mastering advanced techniques can significantly elevate the quality of your creations. You’ll need proficient skills in editing software and a good grasp of image manipulation to ensure your designs stand out.
Working with Complex Patterns and Layers
When dealing with complex patterns in your design, ensuring seamless integration is key. Start by organizing your design into separate layers in an image editor like Photoshop, GIMP, or Pixlr. This allows you to edit parts of your shirt without affecting the whole image.
- Layers: Use layers to separate different elements of your design for easier editing and testing.
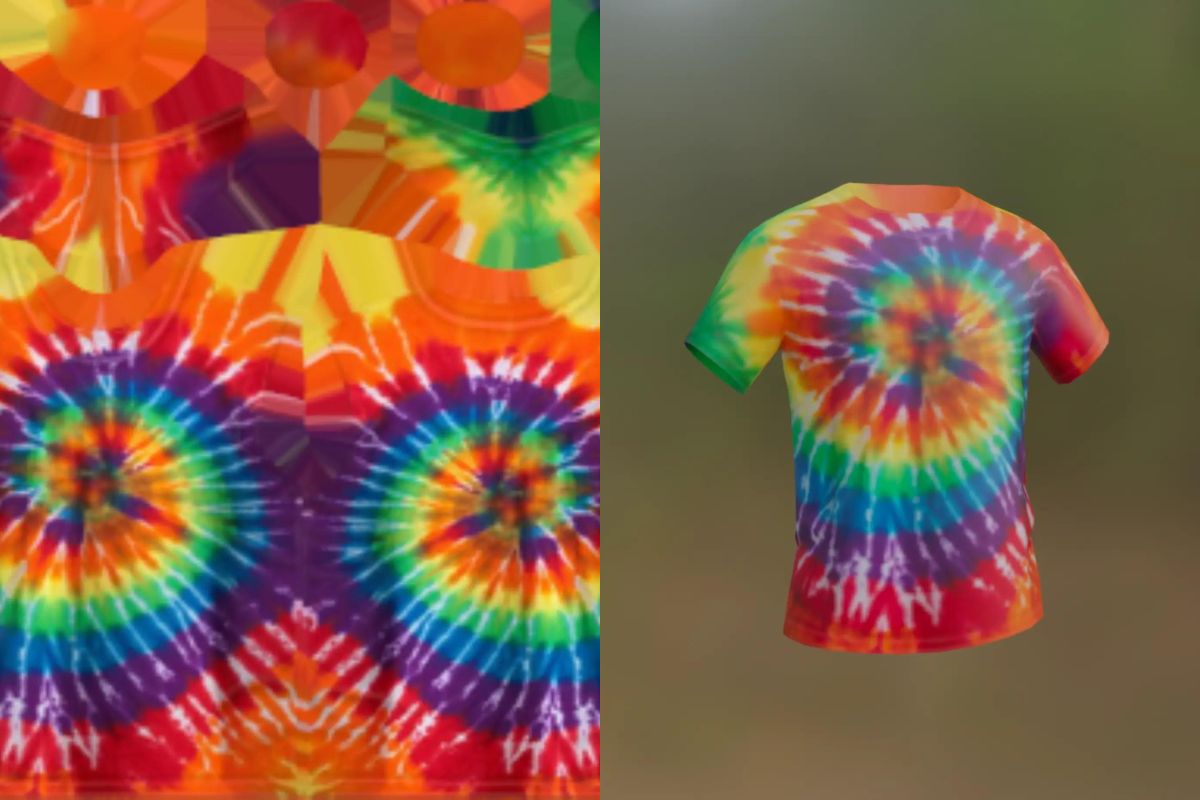
- Patterns: Apply patterns carefully, aligning them with the contours of the Roblox template. Patterns should follow the natural folds and bends of clothing.
Tip: Toggle layers on/off to preview different parts of your design during the editing process.
Technical Tricks for Expert Editors
For those of you who are already familiar with the basics and ready to dive into more technical aspects:
- Stickers and Decals: You can add stickers or decals in your image editor to enhance your design. Place these on a new layer and adjust their opacity for a more integrated look.
- Dotted Lines: These are used to demarcate fold lines or areas that need special attention. Use the line tool in your editor to apply dotted lines where necessary, ensuring they are on a separate layer for easy removal before export.
Export: When your design is complete, export it as a PNG to preserve transparency, maintaining the integrity of your shirt design when uploaded to Roblox.
Remember, while mobile device apps provide convenience, for intricate edits and detailed work, using a robust desktop image editor is invaluable. Always follow Roblox’s guidelines and tutorials to ensure your shirt meets the platform’s requirements.
Optimization and Best Practices
When creating Roblox clothing, like shirts or pants, it’s essential to pay attention to both the compatibility of designs with avatars as well as their aesthetic and practical appeal. Using the correct template and adhering to Roblox’s specifications ensures your designs work well within the game.
Ensuring Compatibility with Roblox Avatars
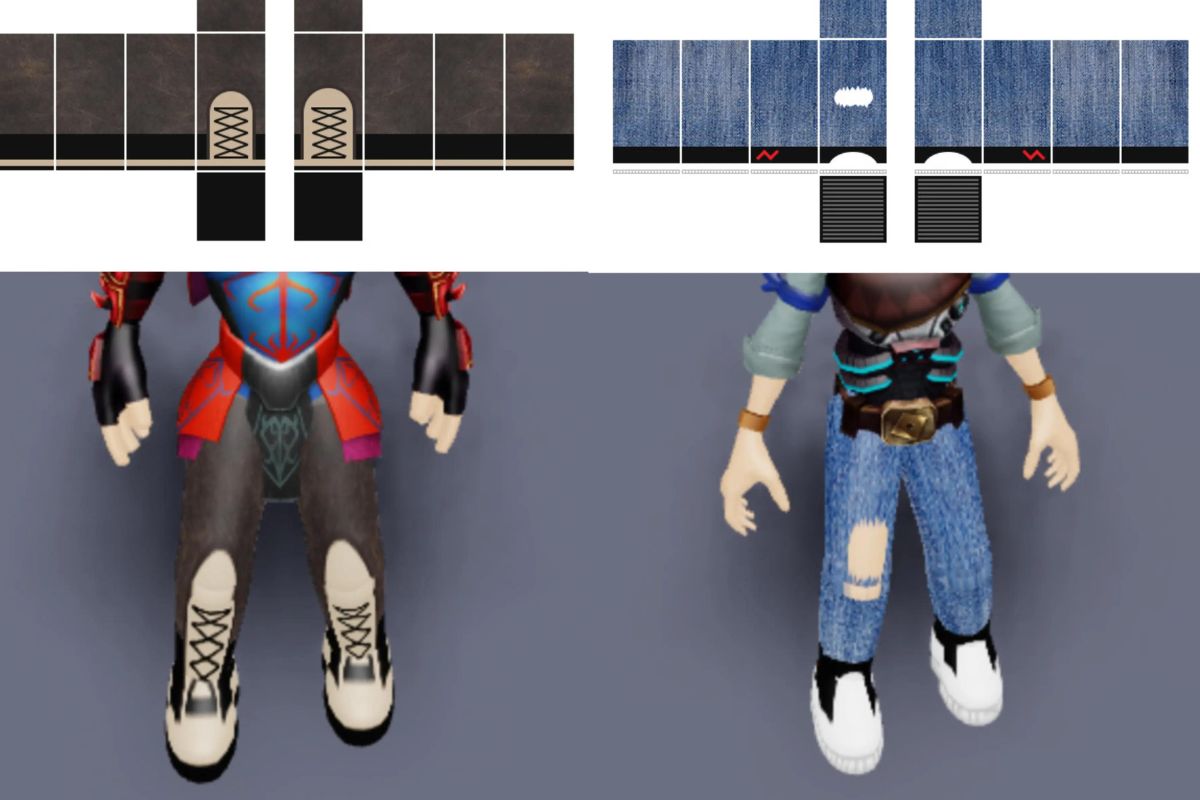
Dimensions and Shape: Your designs must fit within the standard Roblox template dimensions; otherwise, they will not align with the avatar’s body. The template for shirts and pants must be 585 pixels wide and 559 pixels tall. For T-shirts, which are simpler graphics that do not wrap around the avatar, the template should be 128×128 pixels, 256×256 pixels, or 512×512 pixels in size.
Testing: After designing, test your clothing on a Roblox avatar to check for any alignment or scaling issues. Use Roblox’s Asset Manager to upload the design into your experience, allowing you to see firsthand how it appears on an avatar before making it available to others.
Maximizing Aesthetic Appeal and Functionality
Customization Options: While keeping within the guidelines, utilize the full range of customization options. Consider how your choice of color and design can create a unique and eye-catching item. The texture and detail of your clothing can significantly impact the overall look and feel, so invest time here.
Keep it Legible: Ensure that any text or logos within your design remain readable and clear, regardless of the avatar’s movements or the angle from which they are viewed.
By focusing on these factors, you can create Roblox shirts, pants, and T-shirts that are both visually pleasing and work seamlessly with the avatars, enhancing the gaming experience for users.
Frequently Asked Questions
Creating custom shirts in Roblox allows you to showcase your unique style and even earn Robux. To get started, you’ll need to understand template sizes, where to find them, and how to upload your designs.
How can I create a custom shirt in Roblox?
To create your own shirt, use the templates provided by Roblox as a canvas for your design. After crafting your design, you can upload it to Roblox through the Asset Manager.
What is the correct size for a Roblox shirt template?
The ideal dimensions for a Roblox shirt template are 585×559 pixels. Ensuring your design adheres to these dimensions is essential for compatibility.
Where can I download a Roblox shirt template?
Roblox provides templates for clothing on their official website, often in a section dedicated to creators or within Roblox Studio’s library.
Is it possible to make transparent clothing in Roblox?
Yes, you can create clothing with transparent areas by using the alpha channel in your design. This allows parts of the avatar’s body to show through the clothing.
Can you get a Roblox shirt template for free?
All official Roblox shirt templates are available for free and can be found on the Roblox website or in the Roblox Creator Hub.
What are the steps for uploading a custom shirt to Roblox?
Once your design is complete, go to the “Create” section on the Roblox site, select ‘Shirts,’ and click ‘Choose File’ to upload your design. Follow the prompts to name and offer your new shirt on the Roblox marketplace.