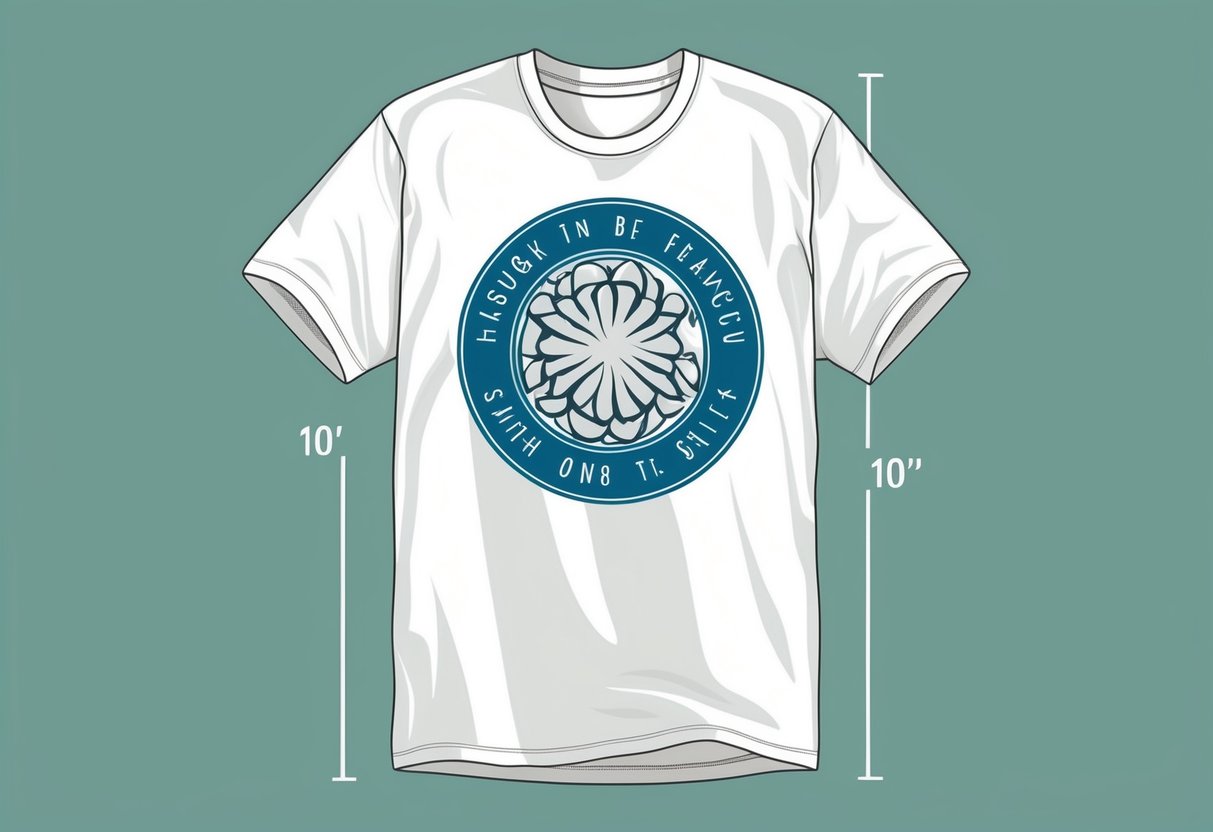
When deciding how big a design should be on a shirt, you have to consider the type of impact you want to make. A standard full-front design usually ranges from 10-12 inches in width and can be up to 14 inches in height. This size grabs attention and is great for making a bold statement on any t-shirt.
For a more subtle look, consider a left chest design, often featured on polo or button-down shirts. This style typically measures 3-4 inches wide and sits elegantly on the upper garment area. It’s an iconic choice for company logos, giving your apparel a professional touch without overpowering the shirt’s overall look.
If you’re planning designs on sleeves, smaller sizes can work well. Short sleeves typically sport a 3-inch by 3-inch design, offering just the right amount of flair without being too much. Larger designs can also feel overwhelming on a smaller canvas, so choosing the right size is crucial for visual impact.
Understanding T-Shirt Design Basics
When creating a t-shirt design, considering the print area, design size, and placement options is crucial for achieving a balanced look. How these elements interact can greatly affect the final appearance of the shirt.
Importance of Print Area and Design Size
The print area refers to the available space on the shirt where you can place your design. Understanding this space helps you determine the best design size to use. Standard design sizes can vary based on the intended print location. For example, a center-chest design typically ranges from 8-10 inches in width, while a full-front design might be 10-12 inches wide and 10-14 inches tall.
Selecting the right size ensures that your design is visible and proportional. You want to avoid overcrowding the shirt or leaving too much empty space. Adjust the design size based on the shirt size too. For smaller shirts, slightly reduce the design size. Conversely, enlarge the design for larger shirts to maintain visual balance.
Different T-Shirt Design Placements
Choosing the right placement is key to enhancing the overall aesthetic of your t-shirt. Common placements include full-front, center-chest, and left-chest designs. Each offers distinct visual effects. Full-front designs cover a large area and are noticeable from a distance, making them ideal for bold statements.
Center-chest designs are positioned about 2-4 inches below the collar and are smaller, creating a balanced look without overpowering the shirt. Left-chest designs are ideal for logos or small graphics and are generally placed about 7-9 inches from the shoulder seam.
Selecting the right design placement complements your design and ensures it stands out effectively. Adjusting your design placement based on shirt type and intended use can greatly impact the shirt’s final appearance.
Determining the Ideal Design Size for your T-Shirt
Choosing the right design size for your t-shirt affects its look and feel. Factors like standard guidelines and the garment type play a role.
Standard Size Guidelines
When creating a design for a t-shirt, you typically aim for standard dimensions that ensure the print looks balanced. Full-front designs usually range from 10 to 12 inches in width and 10 to 14 inches in height. This larger size works well for presenting standout graphics or logos.
For a center-chest design, consider using dimensions between 8 to 10 inches in width. This placement provides a focal point without overwhelming the shirt, making it suitable for slogans or smaller graphics.
Likewise, a left chest design often measures around 3 to 4 inches in size. It’s ideal for logos or smaller elements that require subtlety. Keeping these sizes in mind helps in maintaining proportionality across various sizes of garments.
Adjusting Design Size According to Garment Type
Different garment types may influence the optimal design size. For t-shirts or polos, smaller designs like left chest logos work well. This is because they add a touch of branding without being too bold. On the other hand, larger prints suit sweatshirts or hoodies, allowing the design to cover more fabric area.
Consider the garment’s fit and style. For example, oversized shirts may accommodate larger designs, while fitted shirts look better with smaller, more discreet prints. The fabric type also matters, as thick materials may require a bolder design to stand out effectively.
Popular T-Shirt Design and Print Locations
When designing a t-shirt, deciding where to place your design is crucial. Common areas include the left chest, center chest, full front, full back, sleeves, and more. Each location offers unique visibility and style, catering to different design types and purposes.
Left Chest and Center Chest Options
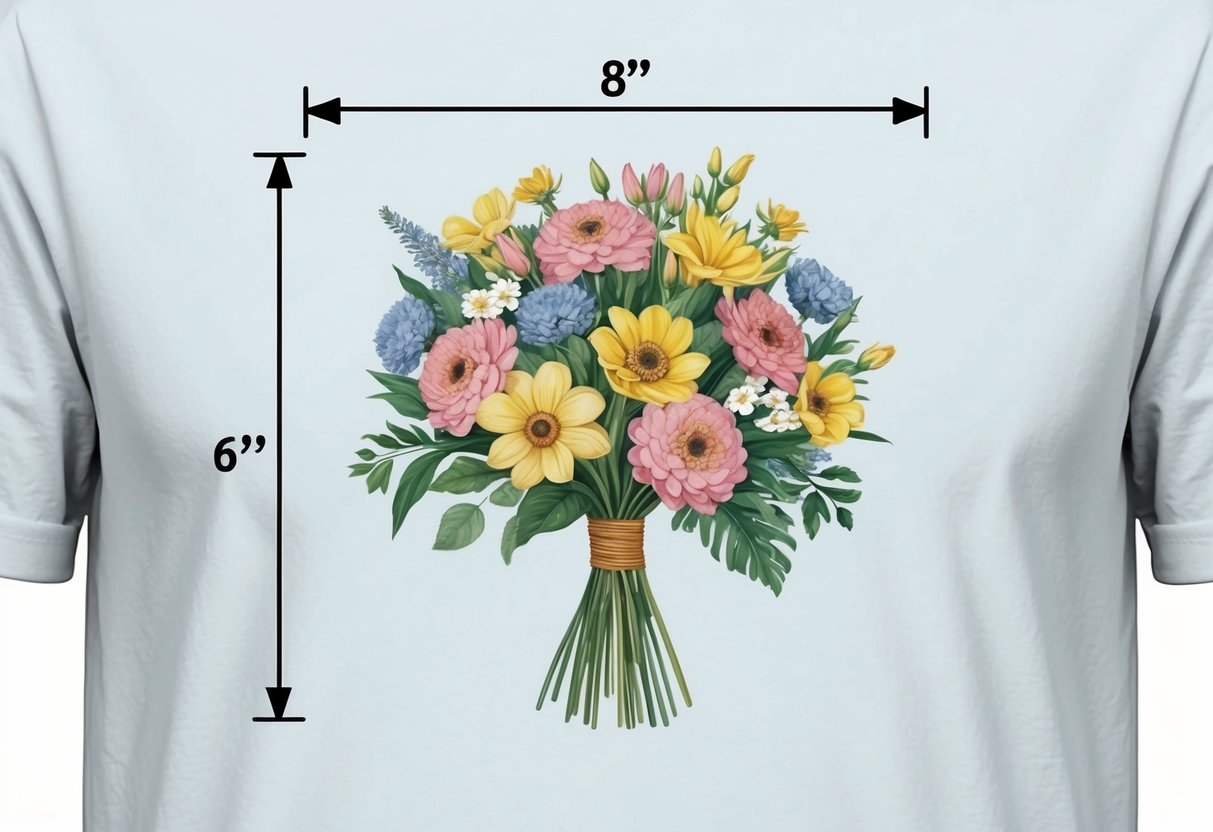
The left chest area is a classic placement for logos. It typically measures between 2.5 to 5 inches in height and width. A left chest print is ideal for logos or small graphics, offering a professional look.
The center chest is another common choice. Designs here are often larger, ranging from 6 to 10 inches wide and 6 to 8 inches tall. This placement is great for graphics or messages directly in the viewer’s line of sight.
Full Front and Full Back Concepts
A full front design covers a larger area, usually between 10 to 12 inches in width and 10 to 14 inches in height. This option is perfect for bold graphics or detailed art, making a strong visual impact.
The full back print is similar in size to the full front, extending across the upper back area. This choice maximizes visibility from behind, suitable for events or sizable logos.
Sleeve and Lower Back Variations
Sleeve prints add unique flair and can involve text or small graphics. Ideal for branding or adding extra detail, sleeve prints are often placed on either upper side.
The lower back is less traditional but offers an edgy look. Smaller in scope, these designs are subtle yet eye-catching, suitable for smaller text or graphics near the base of the t-shirt.
Technical Aspects of T-Shirt Design
When designing for t-shirts, it’s vital to understand the technical details that influence print quality. Key topics include selecting appropriate file types and print methods that ensure sharp and vibrant results.
Understanding File Types and Resolution
For the best results, you must choose the correct file type and resolution. PNG and JPG are common formats. PNG is preferred for its ability to support transparency, which is useful in designs with varying backgrounds. JPG can work, though it doesn’t support transparency.
Pay attention to image resolution and ensure your design is at least 300 DPI (dots per inch). This resolution helps maintain image clarity on fabric.
Consider the maximum file size allowed by your printer to avoid issues during printing. Large, high-resolution files are ideal, but they still need to adhere to your printer’s specific limits.
Selecting the Right Print Method
Choosing the right print method is crucial. Direct-to-Garment (DTG) printing is excellent for intricate designs. It works well with high-resolution images and allows for a wide color range.
Screen printing offers vibrant colors and durability but requires separate screens for each color, which might not be cost-effective for complex graphics.
Sublimation printing is best for polyester fabrics and allows for all-over designs. Meanwhile, heat transfer vinyl (HTV) suits simple designs and text, providing a raised texture.
Align your choice with your design complexity and material to achieve optimal printing results.
T-Shirt Branding and Logo Placement
Choosing the right placement for your logo on a t-shirt can make a big difference in how your brand is perceived. It’s crucial to find a balanced spot that ensures visibility and appeals to your target audience.
Effective Logo Placement Guide
A logo on the left chest is a common and timeless choice. This spot offers a professional look, especially when creating shirts for staff or event teams. Typically, the logo size here is about 3 to 4 inches wide and positioned 3 inches below the collar.
Center-chest placement is another option, where the design is centered a few inches below the neckline. This location is eye-catching and works well for logos that need to stand out. When opting for this design placement, ensure the logo is 8 to 10 inches wide to maintain balance and design clarity.
For sleeve logos, keep the design small and simple. A logo that’s 2 to 3 inches wide is often ideal. This placement is a subtle touch but can still effectively contribute to brand identity.
Maximizing Brand Impact with Design Placement
To maximize your logo’s impact, consider printing on the full-front. This placement, covering the breadth from 10 to 12 inches across and 10 to 14 inches in height, allows the logo or design to stand out prominently.
Outdoor labels under the back collar are a unique spot to explore creative branding. This location is suitable for including additional design elements or text to supplement your main logo. It generally measures 3 by 3 inches, making it the perfect subtle touch to your apparel.
Finally, large back designs offer the most space and allow for maximum creativity and visibility. This approach is great for promotional branding. Make sure the design covers up to 12 by 16 inches for greatest effect while ensuring comfort for the wearer.
Advanced Design Considerations
When designing for shirts, it’s important to think about specific techniques and placements. Oversize prints and sleeve designs offer creative possibilities, while specialty applications like embroidery and heat transfer vinyl can enhance your design’s appeal.
Oversize and Sleeve Design Strategies
Oversize prints add boldness and make a strong statement. Placing them 2 to 4 inches below the collar ensures they stand out without overwhelming. You can extend designs up to 15 inches wide and 16 inches tall for maximum impact.
Sleeve designs can be tricky but rewarding. They add extra flair and are perfect for logos or patterns. Place sleeve designs about an inch below the shoulder seam for balance. Remember to adjust based on sleeve length and shirt size to keep it tasteful.
Incorporating Specialty Application Techniques
Embroidery adds texture and a high-end touch. It’s great for logos or small details. Keep in mind the shirt’s fabric, as thicker materials work best.
Heat transfer vinyl and direct-to-garment printing offer vibrant colors and intricate detail. They are suitable for detailed artwork and can suit various shirt styles.
For sublimation shirts, designs become part of the fabric, which is ideal for all-over-print designs. Choose sublimation for designs with many colors or photo realism. By carefully selecting your method, you can enhance the visual impact and durability of your shirt designs.
Finalizing Your T-Shirt Design
When finalizing your t-shirt design, ensure the design fits within the intended print area while maintaining the correct colors. It is crucial to check all aspects before printing to achieve the desired result.
Pre-Print Checklist
Before printing, confirm that your design fits within the recommended print dimensions.
For a standard full-front design, aim for a size of 10-12 inches wide and 10-14 inches tall. Make sure your design size aligns with the t-shirt size and type.
Anchor points are critical; typically, the design should sit 2 to 4 inches below the collar for a balanced look.
Consider the print method as well. Techniques like DTG and DTF have unique print area constraints. Check for details related to these techniques, as they affect how the design appears on the fabric.
Double-check that the maximum size of your design is suited to the specific method being used.
Ensuring Consistent Print Colors
Consistent print colors are vital for custom t-shirts to look professional.
Start by understanding the difference between RGB and CMYK color profiles. Use CMYK for printing because it better matches the final printed colors.
Before printing, conduct a sample print to see how the colors appear on fabric. Adjust as needed to match your vision.
Pay attention to how colors blend when overlapping; colors on screen may differ from what’s printed.
Keep in mind the fabric color, as it can impact the final appearance. For example, darker fabrics might require additional white ink layers as a base to ensure vibrant colors.
Frequently Asked Questions

When designing a t-shirt, the size and placement of your graphic are important for achieving balance and visual appeal. Here we address the most common questions about sizing and positioning.
What is a standard size for a t-shirt graphic?
A standard size for a t-shirt graphic often ranges from 8 to 12 inches in width. This ensures the design is neither too large nor too small, making it stand out without overwhelming the shirt.
What are the typical dimensions for a men’s t-shirt design?
Men’s t-shirt designs typically measure between 10 and 12 inches wide and up to 16 inches tall. This size offers a good fit for various shirt sizes, ensuring the design is visible and aesthetically pleasing.
How far down from the neckline should a t-shirt design begin?
You should position your design about 2 to 4 inches below the neckline. This placement creates a balanced look and prevents the design from creeping too close to the collar.
What size should a print or decal be on a women’s t-shirt?
For women’s t-shirts, the design size is often a bit smaller to suit the garment’s fit. A print size of 8 to 10 inches wide is common, providing elegant visibility without overpowering the shirt.
How do design dimensions change for different sizes of t-shirts?
For smaller shirts, reduce the design size slightly to prevent overcrowding. On larger shirts, increasing the design ensures better visibility. If your base size is, say, 10 inches wide for a medium shirt, consider adjusting by an inch or so as sizes change.
What are the common pixel dimensions for a digital t-shirt design file?
Digital t-shirt design files typically range from 3000 to 5000 pixels wide, depending on the design’s complexity. This resolution ensures the final print remains crisp, detailed, and professional-looking.